Inserting tables in blog posts organizes your data in a tabular form which looks more tidy and clear.Tables can be of many sizes including different rows or columns.Mostly today all bloggers use HTML tables,and there is one drawback of using these tables that it is quite cumbersome for a new blogger because it requires right coding for full customization and it wastes more time.
Tables are extremely needed if you are showing your blog post in a tabular form or are comparing the specifications of any service or product.In case if you just write a blog post then it would be unclear to understand,it would be like that you have just thrown colors on the canvas and haven’t created your masterpiece.In this post you will learn a trick to insert Microsoft office tables in your wordpress or blogger blog’s HTML.I am using Microsoft office 2007 to create tables.

How To Insert Microsoft Office Word Tables In WordPress Or Blogger Posts
To simply insert a Microsoft office table in your blog post you need to first create a table in office 2007.Below is a step by step guide to create an office 2007 table.
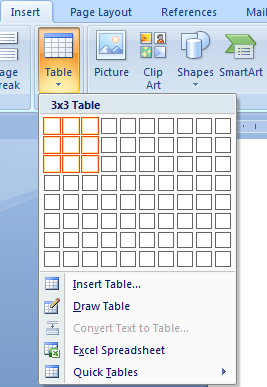
Open Microsoft office and click “Insert” tab and select “Tables”.Now a table grid will open you need to select the number of boxes to create a table.For example if you want a 3×3 table then you need to select 3 rows and 3 columns.Example is shown below.

Now after you inserted the table you need to click the “Design” tab.Under the design tab you can fully customize your table by choosing color styles.There are many color styles available and you should choose the style which matches your blog’s color style.

You can even increase the space of table’s rows and columns by simply dragging the line away from their location.Also you can give separate color for each cell.It is upto you how you want to design your table from wide range of options available.
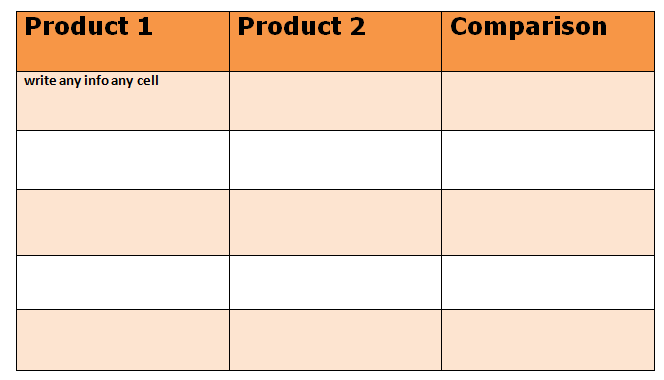
A fully customized table will look like as follows.Remember that you can format the text according to the basic formatting options provided in Home tab.

The Technical Part
Now you have successfully created and customized your table and now it is ready to be inserted in your wordpress or blogger blog’s post.To do this first we have to convert this table in to an HTML code to be used in the blog post’s HTML.To do this follow the steps below.
- Click on “Save As” a save as dialogue box will open.In the “Save as type” drop down list choose “Web Page,Filtered” and click save.It is mandatory to save your table as a filtered web page otherwise it will not work in blog’s HTML.
- Now this file will be saved as a HTML file.To directly view that it is working in your browser you can open this file with any browser and you will see that Microsoft tables are rendered very nicely and neatly in the browser.
- To access the HTML code of this table simply right click on this file and choose “open with” from that list choose “Notepad”.
- Now copy the HTML code and directly paste anywhere in your blogger or wordpress blog’s HTML.
- You are done.
NOTE : The code will not work in compose mode you need to insert the code in the blog’s post HTML.
Purpose Of Using Microsoft Tables
As you know tables can be used to represent tabular data.These tables are highly recommended if you are comparing two products side by side.These tables will be best choice to set up the comparison between the two products as you have to put just important points side by side and it would be more easy to read and understand by your blog readers.It is clear that if you are comparing two products without using tables then you will probably write about them like a simple blog post one by one.
So any reader will read the points about first product then it will move to the next.During this time he/she needs to scroll down the page to compare the features which may annoy them.So if you use Microsoft tables then your product comparison will be shown side by side and readers will easily understand it.So it’s the best choice to use in your blog posts.
Make Your Own Customized Tables
As I previously stated that these Microsoft tables are highly customizable.You can create your favourite tables that matches your blog’s theme and template.Here are some tips to create customized tables.
First of all click the “Insert” tab and click tables and choose the number of rows and colums.
When you choose the rows and columns the “Design” tab will automatically open.
Now you can choose from table styles which best fits for your blog’s theme.
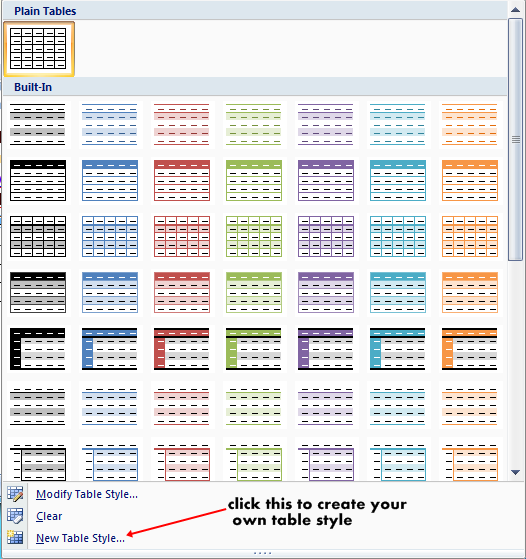
You can click the small triangle button below the “Border” button to access all the table styles.
Click “Create New Table Style” to create your own customized table style.

Benefits Of Using Microsoft Office Tables In Blog Posts
- They are highly customizable and can be easily created.
- You don’t need to do any serious coding.
- You can create matching tables which matches with your blog’s theme.
- Saves your blogging time.
- Works with any browser.
- They look very neat and tidy.
Now you have successfully learnt to insert Microsoft office tables in blog posts.If you feel any problems in doing this then I am here to help.
By Guest Author – This is a guest post by Abhishek from PCNEXUS.He mostly blogs about gadgets.His areas of interest includes blogging,seo,android,software and hardware.You can follow him on twitter @pcnexus.


