In the comments here on Spice Up Your Blog when i as the admin or author, post a comment in the bottom corner there is a sparkling animated badge with the word ‘Admin’.I have received so many requests to cover this in a tutorial so today i will show you how it’s done.OK so back in April i published a post showing how to use different colors on the authors or admin comments on Blogger and we actually use the very same technique here but this time with a background image.While i will give you the URL for the admin badge i have been using and everyone seems to like so much you can use any image.
Now while we are adding the admin badge or image we might as well add some more styles to the author comments so they stand out, it does not require any extra work so why not.To that end i have also included the Css for your comments to have a different background color, Different border color and the border will have rounded corners.Lets look at the demo :

Now i have broken this tutorial into two sections, everyone can follow the first 4 steps.Then we have separate steps for people with templates from the Blogger template designer and people with custom or older blogger templates.This accompanied by the nature of the tutorial makes it a little harder, but I’m sure you can do it just take your time.
Adding The Admin Badge To Author Comments
Remember Always Back Up Your Template Before You Make Changes – How To Back Up A Blogger Template
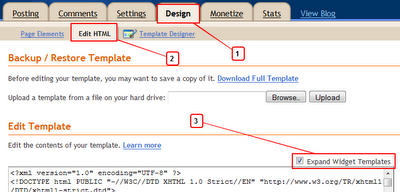
Step 1. In your Blogger dashboard click > Design > Edit Html > Tick The Expand Widget Templates Box :

Step 2. Find the following piece of code in your blogs Html : (Click Ctrl and F for a search bar to help find the code – More Info)
]]></b:skin>
Step 3. Copy and Paste the following code directly Above / Before ]]></b:skin>
.comment-body-author {
background: url("http://spiceupyourblogextras.googlecode.com/files/admin.gif") no-repeat scroll right bottom #BFE3FE;
border: 1px solid #80C8FE;
-moz-border-radius: 6px;-webkit-border-radius: 6px;
padding:5px 35px 3px 3px;
}
Note – The image URL is highlighted in yellow and you can change that to use a different image.The colors are also highlighted, in green is the background color and in blue is the border color.To get the Hex code for the colors you want go to this chart – Hex Code Color Chart.
Step 4. Save Your Template, But we are not finished.
In the next step you need to find a section of code in your template and add two extra snippets of code to it.When testing this i found older and custom Blogger templates are different to templates from the Blogger templates designer.For that reason i have two separate methods.The first is for people with Blogger templates that are not from the template designer the second is for templates from the template designer….Got It ….
Users With Custom And Older Blogger Templates Follow These Steps
Step 1. Now we need to edit the following section of code in your template.Finding a section of code can be hard so the best way is to find the first line (Use The Ctrl F Search Method) and work from there.If you cant find the first line look for the second line, remember Blogger templates can have different code so it might not look exactly the same.
<dd class='comment-body'>
<b:if cond='data:comment.isDeleted'>
<span class='deleted-comment'><data:comment.body/></span>
<b:else/>
<p><data:comment.body/></p>
</b:if>
</dd>
Step 2. OK you have located the section of code, we now add two snippets of code to it.You can see the two snippets and were i have added them below in red.
<b:if cond='data:comment.author == data:post.author'>
<dd class='comment-body-author'>
<p><data:comment.body/></p>
</dd>
<b:else/>

<dd class='comment-body'>
<b:if cond='data:comment.isDeleted'>
<span class='deleted-comment'><data:comment.body/></span>
<b:else/>
<p><data:comment.body/></p>
</b:if>
</dd>

</b:if>

<dd class='comment-footer'>
<span class='comment-timestamp'>
<a expr:href='"#comment-" + data:comment.id' title='comment permalink'>
<data:comment.timestamp/>
</a>
<b:include data='comment' name='commentDeleteIcon'/>
</span>
</dd>
</b:loop>
</dl>
Step 3. Once your happy you have the code in the right place you can save your template and check it out.
Users With Templates From The Template Designer Follow These Steps
Step 1. Now we need to edit the following section of code in your template.Finding a section of code can be hard so the best way is to find the first line (Use The Ctrl F Search Method) and work from there.If you cant find the first line look for the second line, remember Blogger templates can have different code so it might not look exactly the same.
<dd class='comment-body' expr:id='data:widget.instanceId + data:comment.cmtBodyIdPostfix'>
<b:if cond='data:comment.isDeleted'>
<span class='deleted-comment'><data:comment.body/></span>
<b:else/>
<p>
<data:comment.body/>
</p>
</b:if>
</dd>
Step 2. OK you have located the section of code, we now add two snippets of code to it.You can see the two snippets and were i have added them below in red.
<b:if cond='data:comment.author == data:post.author'>
<dd class='comment-body-author'>
<p><data:comment.body/></p>
</dd>
<b:else/>

<dd class='comment-body' expr:id='data:widget.instanceId + data:comment.cmtBodyIdPostfix'>
<b:if cond='data:comment.isDeleted'>
<span class='deleted-comment'><data:comment.body/></span>
<b:else/>
<p>
<data:comment.body/>
</p>
</b:if>
</dd>

</b:if>

<dd class='comment-footer'>
<span class='comment-timestamp'>
<a expr:href='data:comment.url' title='comment permalink'>
<data:comment.timestamp/>
</a>
<b:include data='comment' name='commentDeleteIcon'/>
</span>
</dd>
</b:loop>
</dl>
</div>
Step 3. Once your happy you have the code in the right place you can save your template and check it out.
OK that was tricky so i hope you were able to follow and style the author comments on your blog.Make sure to check out more of the great posts and tutorials on Blogger comments.
Drop Your Comments And Questions Below.


